#1. In Start menu Search option, type: IIS and click Internet Information Services Manager or simply do a run command: inetmgr .
#2. Under Connections, You’ll see your PC name click on it to expand the list. Now you can see “Sites” click on it to expand.
#3. Under Sites you can see Default Web Site, right click on it and Select EDIT BINDINGS.
#4. Edit HTTP binding port from 80 to 81.
#5. Open your browser and type: //localhost:81/yoursite. You should be able to access your local sites without any problems.
Thứ Hai, 27 tháng 2, 2012
Thứ Ba, 14 tháng 2, 2012
Virtual Host trong XAMPP
Cách cấu hình thư mục ảo (Virtual Directory - như trên IIS) trong XAMPP
Có hai vấn đề mà tôi thấy cần phải viết bài này:
Với những ai đã quen dùng Windows chắc cũng sẽ thao tác dễ dàng với IIS thì việc cấu hình một thư mục ảo (Virtual Directory - VD) thật sự đơn giản và chưa đầy 30 giây. Tuy nhiên, nếu bạn muốn chạy các ứng dụng viết trên nền PHP hoặc những nền tảng khác (thường thì chạy ổn định trên các máy chủ web lấy Apache làm nhân như Tomcat, XAMPP, JBoss...) trong môi trường Windows thì tôi nghĩ là nên cài thêm XAMPP hoặc Apache. Có rất nhiều bài viết trên mạng bàn luận lý do của điều này. Ở bài viết này, tôi không đi chi tiết vào vấn đề đó.
Rõ ràng, nếu chúng ta tập trung các ứng dụng web vào cùng một thư mục cho dễ dàng quản lý là điều mà nhiều người muốn. Ngay cả IIS, tôi cũng rất ít đặt các websites vào thư mục Inetpub vì sợ rằng tính năng hay tò mò của mình mà đôi khi làm hỏng cả Windows thì việc cứu lấy các website cũng vất vả. Với XAMPP, các bạn lập trình web quá quen với thư mục htdocs chứa tất cả các ứng dụng web. Được một cái hay là XAMPP cho phép bạn cài đặt trên thư mục gốc của ổ đĩa khác với ổ hệ thống (C:). Khi đó, chúng ta cũng không quá lo lắng trong trường hợp Windows bị đột tử. Tuy nhiên, trong trường hợp mà bạn phát triển các project mà resources muốn đặt trong cùng một thư mục với specification và resources khác thì bài viết này lại có ý nghĩa hơn (vì cách quản lý thông thường là ít ai để những tài liệu phân tích trong thư mục web cả).
Phần tiếp theo tôi hướng dẫn cách cấu hình một VD trong XAMPP khi chạy trong hệ điều hành Windows.
Giả sử tôi có một thư mục D:\WebApps chứa hầu hết các ứng dụng web, và có một web site tên thư muc là: jQuery. Giả sử XAMPP được cài trên ổ D:, tức đường dẫn là: D:\xampp. Thông thường, nếu jQuery nằm trong thư mục D:\xampp\htdocs\jQuery thì khi gõ vào trình duyệt: http://localhost/jQuery, nó sẽ vào thẳng web site. Nhưng ở đây, nếu bạn chưa cấu hình VD cho jQuery mà chạy url trên thì chắc chắn lỗi. Do đó, chúng ta chỉ cần làm một thao tác nhỏ sau:
Chỉ cần copy và paste vài thẻ XML trên vào file: D:\xampp\apache\conf\extra\httpd-xampp.conf, nhớ đặt vào giữa thẻ IfModule.
Tái bút:
Nếu chạy XAMPP trên Ubuntu thì việt tạo một VD không cần thiết. Bạn có thể đặt thư mục của web site ở bất cứ đâu (ngoài htdocs) vẫn chấp nhận. Chỉ thêm một lệnh tạo một static link là xong:
Giả sử thư mục web: it4bus có đường dẫn đầy đủ như sau: /media/Data/WebApps/it4bus. Vào thư mục htdocs, gõ lệnh: ln -s /media/Data/WebApps/it4bus. Nếu có yêu cầu sudo thì bạn nhớ kèm nó vào nhé.
Trên Windows Vista/7 có lệnh mklink để tạo một symbolic link nhưng nó không cho phép thao tác chỉnh sửa trên thư mục đó như một web site thông thường.
Thứ Năm, 9 tháng 2, 2012
Mẫu thiết kế

Trong công nghệ phần mềm, một mẫu thiết kế là một giải pháp tổng thể cho các vấn đề chung trong thiết kế phần mềm. Một mẫu thiết kế không phải là một thiết kế hoàn thiện để mà có thể được chuyển đổi trực tiếp thành mã; nó chỉ là một mô tả hay là sườn (template) mô tả cách giải quyết một vấn đề mà có thể được dùng trong nhiều tình huống khác nhau.
Các mẫu thiết kế hướng đối tượng thường cho thấy mối quan hệ và sự tương tác giữa các lớp hay các đối tượng, mà không cần chỉ rõ các lớp hay đối tượng của từng ứng dụng cụ thể. Các giải thuật không được xem là các mẫu thiết kế, vì chúng giải quyết các vấn đề về tính toán hơn là các vấn đề về thiết kế.
Chủ Nhật, 5 tháng 2, 2012
SVN and VS
Web development with Visual Studio often requires sophisticated configuration management. However, VisualSVN supports the most of possible configurations and is widely used by web developers.
The major web development options under Visual Studio are:
- using Web Application projects;
- using file system based Web Site projects;
- using local IIS based Web Site projects;
- using remote IIS based Web Site projects;
VisualSVN completely supports web development with Web Application projects and partially supports web development with Web Site projects. Please read the rest of the chapter carefully if you are using Web Site projects.
You can also consider migrating your Web Site projects to Web Application projects. For further details please follow the guidelines.
Web Development with Web Site Projects
VisualSVN requires all projects to be stored in a single file system subtree. This restriction can make initial configuration a little difficult if you are using Web Site projects.
File System Based Web Site Projects
The content of file system based Web Site projects are located on your hard drive. Unfortunately, Visual Studio arranges Web Site projects separately from other solution items, by default. But you can easily reconfigure you solution layout to allow VisualSVN to control your Web Site projects.
When you create a new Web Site project Visual Studio arranges your solution files as shown below.
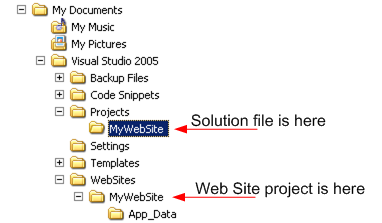
As you can see, the Web Site project and other solution files are located in separate file system subtrees. To make VisualSVN able to control your solution you need to create your Web Site project differently. Here are the simple steps to follow so VisualSVN can control your Web Site Project Solution:
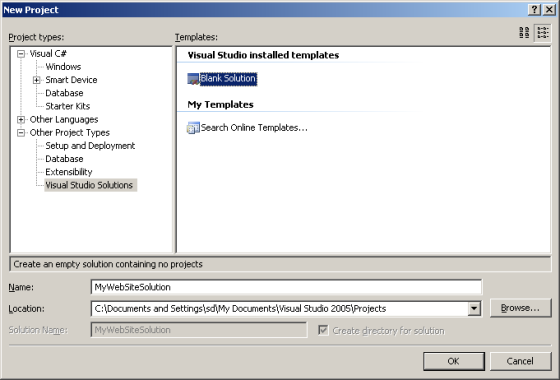
Create a Blank Solution project as shown in the picture below.
Then choose the | | main menu command and specify the location for the Web site as the same root folder as your solution file.
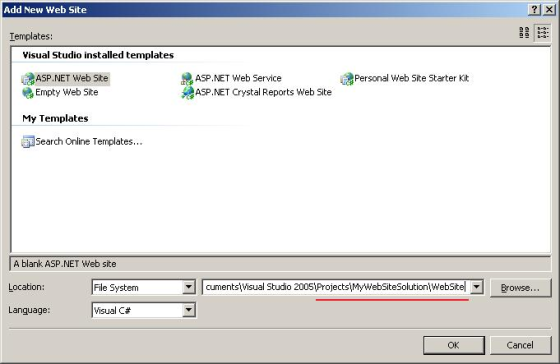
Now your Web Site project and solution file are located in the same file system subtree as shown below.

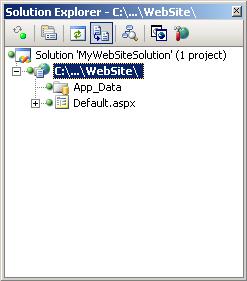
Now you can choose the | main menu command to put your solution under Subversion control and commit the first version of your source files to a repository using the | main menu command. You should then see green traffic lights status icons in Solution Explorer as shown in the picture below.
You can easily change the layout of your pre-existing Web Site project by following these steps:
- remove the Web Site project from your solution (this just removes a reference to the Web Site project from the solution file. The content of the Web Site project will be preserved on your hard drive);
- move your Web Site project folder to the same file system subtree as your solution file using Windows Explorer;
- add the Web Site project back to your solution from its new location using the | | main menu command.
Local IIS Based Web Site Projects
The content of local IIS based Web Site projects are located in a virtual directory on your local IIS web server. This virtual directory is configured automatically by Visual Studio when you create new Web Site project.
Despite the fact that your project is stored on your local web server Visual Studio accesses the content of the project using a plain UNC path. By default the virtual directory points to a physical folder located within
C:\Inetpub\wwwroot. The default layout of a local IIS based Web Site project is shown in the picture below.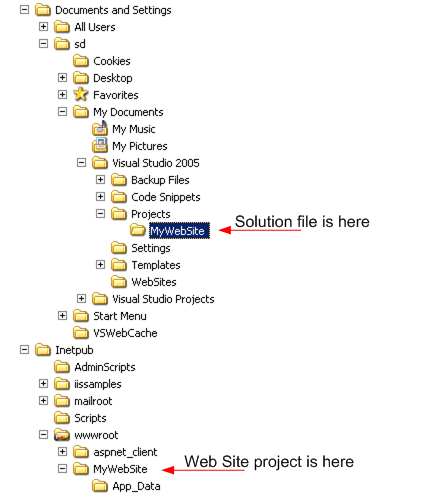
In order to allow VisualSVN to control your local IIS based Web Site project you should change the virtual directory mapping. Follow these steps to do this:
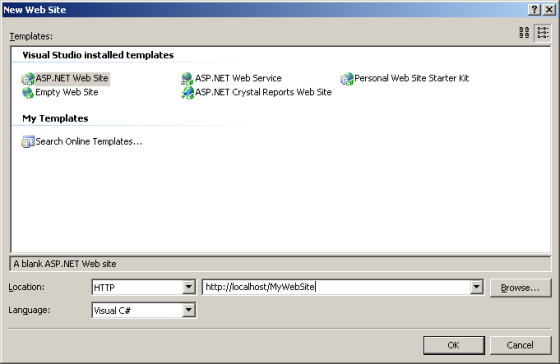
Create a Blank Solution project as done in the previous section. Then choose the | | main menu command to create new Web Site project and specify location for it on the local IIS web server as shown in the picture below.
Then close the solution in Visual Studio and go to Windows Explorer. In order to change the mapping of the automatically created virtual directory you need to copy content of the web site to a more appropriate location. But you need to take care to retain the NTFS permission settings.
Choose the context menu command for the old physical folder within
C:\Inetpub\wwwroot.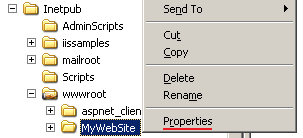
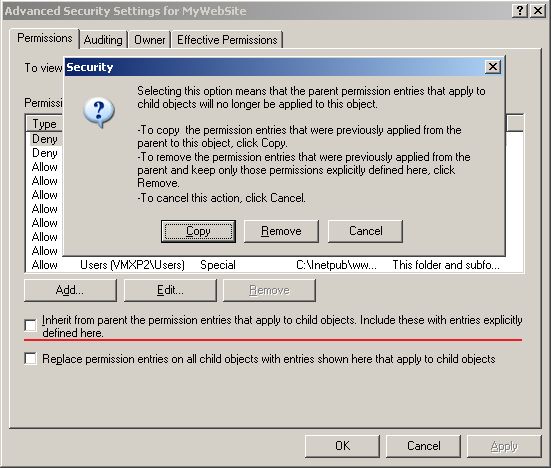
Click the Security tab and press the Advanced button. Then uncheck the "Inherit from parent..." checkbox and press the Copy button in the dialog to copy the permissions entries that were previously inherited from the parent of this folder. Then press OK to apply your changes.
To copy the content of the Web Site project to your solution tree please execute the following command (without line breaks):
xcopy
C:\Inetpub\wwwroot\MyWebSite
"\MyWebSite\"
/E /K /O /X
C:\Inetpub\wwwroot\MyWebSite
"
/E /K /O /X
This command will copy the entire content of your Web Site project to the new location with all NTFS permissions preserved.
Then open the IIS console and delete the old virtual directory.
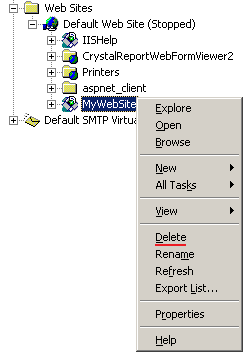
Then create new virtual directory and map it to a new physical location of your Web Site project.

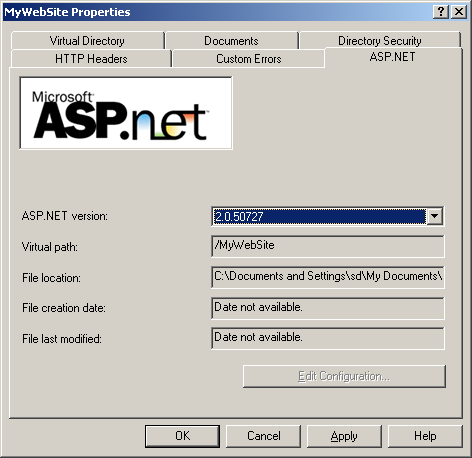
Then choose the context menu command and make sure that the newly created virtual directory has appropriate ASP.NET settings.
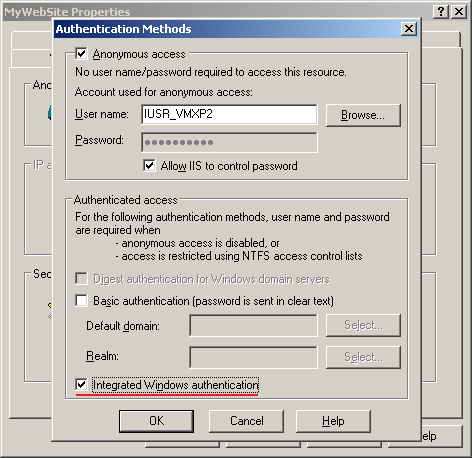
Then choose the Directory Security tab and press the topmost Edit button to modify the anonymous access and authentication settings. Please check the Integrated Windows authentication checkbox to allow debugging from within Visual Studio. Please note: This action is optional and can harm production web server security.
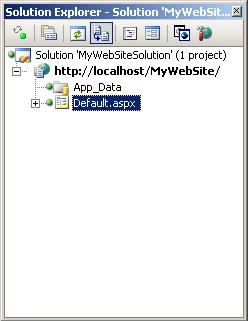
Then go back to Visual Studio and open your solution again. Your Web Site project will be opened from its new location. Now you can choose the | main menu command to put your solution under Subversion control and commit the first version of your source files to a repository using the | main menu command. Finally, you should see green traffic lights status icons in Solution Explorer as shown in the picture below.
Please note that you can easily change the layout of your pre-existing local IIS based Web Site project. Just skip the steps related to a new solution and Web Site project creation in the instructions above.
Remote IIS Based Web Site Projects
The content of a remote IIS based Web Site project is located in a virtual directory at a remote IIS web server. Remote IIS based Web Site projects are almost unsupported by VisualSVN.
The only possible way to control remote IIS based Web Site projects with VisualSVN is to map a remote virtual directory to a physical folder on a local machine. But this solution is not very practical and requires sophisticated NTFS permissions management.
Đăng ký:
Nhận xét (Atom)